As you (hopefully) read on Friday, I was in the throws of creating pizza and a pudding. The latter of which turned out to be babka. I adore baking babka - the steps you have to take, the patience involved, timing is crucial, and last but not least...the smell, that wonderful warm, childhood memories, sweet but delicate smell that emits from the oven after about 15-20 minutes of it going in.
As for the pizza - it came out, thankfully, just as expected and on time, I have posted photos of it here to inspire and make you hungry! Hey, don't hate the cook, hate the desire ;) It's a simple recipe that can be adapted to suit anyones tastes or even if you have people who have allergies, this recipe works very well for them too. Although it is made with wheat flour so isn't applicable for coeliac suffers.
Here's the recipe for the pizza :
For the Base:
500g (and a little more) strong bread flour
25g fresh
yeast
260ml water
15g salt
40ml olive oil
Mixed dry Italian herbs
Garlic powder
For the topping:
Tomato puree (use as much as you need to cover your pizza, or to taste)
Fresh garlic
Fresh onion
olive oil
Peeled plum tomatoes
Salt
Black Pepper
Mixed herbs
Method :
1. In a bowl mix together 200g of the flour with the yeast, then add 160ml of the water and mix. Cover and set aside for 2 hours to rise.
2. Now mix in the remaining flour and water,adding the salt and olive oil. I sometimes find, depending on the brand of flour I'm using (or the country in which you live in), the dough mix remains a little too sticky at this point. If you find this too, just add some more flour before adding the herbs and knead in.
3. Now, take your garlic powder and mixed Italian herbs and sprinkle them around the edge (so in between the dough and the bowl) of your mix, and knead them in. This creates a lovely, fragrant and tasty base once cooked).
4. Set the dough aside in its mixing bowl to double in size.
4. Preheat the oven to 220ºC
5. Roll out the dough into a large circle and place on a lightly oiled baking sheet.
Note : This also works in a square shape and I regularly bake my pizza on my oven tray (you know, the ones you get with your oven).
6. Bake the dough base for 5 minutes, then remove from the oven.
7. Meanwhile, chop the fresh garlic and onion finely (leaving some nice onion rings for topping) and add it to the oil, puree, tomatoes, herbs, salt and pepper in a saucepan and gently warm through on the hob.
8. Spread over your pizza, making sure to leave enough room on the edge so you can retrieve it from the oven without dirtying your oven mitts :)
9. Bake for a further 10-15 minutes, pull out just before the tomato mix starts changing colour.
10. Add your choice of toppings - cheese, onion, ham, pineapple, etc etc and return to the oven for about another 5-10 minutes, just until your topping is warmer thoroughly and cheese has melted.
Note : If you are having meat on top of your pizza that needs to be cooked, such as beef mince, chicken strips, pork cuts (yes, I have seen that) then please cook this prior to the oven stage. I probably don't need to specify this but just in case you're having 'one of those days' :)
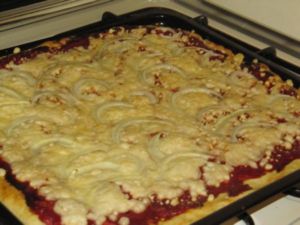
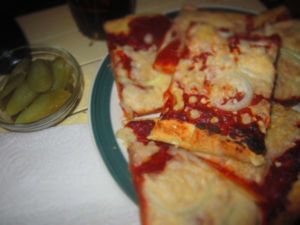
So here's a couple of photos of my creation, I did a nice simple one on Friday.
The pizza in the tray, fresh from the oven
Ready to eat, with pickles at the ready (of course) and cold cola - yum!
Now, onto the pudding! Babka wouldn't be babka for me unless it was chocolate inside, and in a loaf tin. Maybe that's because I'm a purest and being part Lithuanian probably doesn't help decrease that. My nan would probably hate me if I did my babka any other way.
My recipe for this is sort of a combination of my own creation and one I was given...it seems to work out ok and I've had no complaints I have to say this was my first time cooking babka here in Israel so I was a little nervous about the change in flour, humidity and yeast.
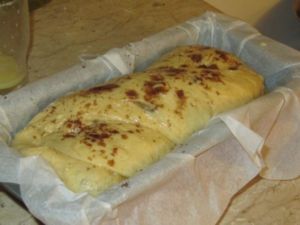
Here's a photo of the babka just before going into the oven -
All risen and looking pretty :)
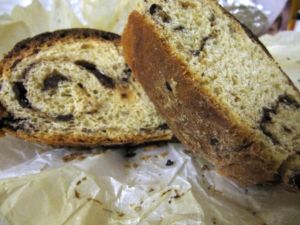
Now, I have to say I forgot to take another photo after it'd come out of the oven so I do apologise for this but to try and make up for it, here's a photo of a slice of it (before I devour it).
Slices of chocolatey babka goodness
If you want a good babka recipe check out
http://www.israelnationalnews.com/News/News.aspx/153119#.ULY-GeTFWSo It's a really nice recipe (from the looks of it, I haven't baked it myself) and it's well guided too so if it's your first time making babka, it's a good place to start without feeling overwhelmed!
I hope you enjoyed the photos and this marks my first savoury recipe I have posted!
Make sure you share your babka and/or pizza stories, I always love hearing from you guys,


")
")


")


