Showing posts with label Chocolate. Show all posts

Wednesday, 28 November 2012

Pizza and pudding update

Posted by Unknown at 9:41 pm 1 comments
As you (hopefully) read on Friday, I was in the throws of creating pizza and a pudding. The latter of which turned out to be babka. I adore baking babka - the steps you have to take, the patience involved, timing is crucial, and last but not least...the smell, that wonderful warm, childhood memories, sweet but delicate smell that emits from the oven after about 15-20 minutes of it going in.
As for the pizza - it came out, thankfully, just as expected and on time, I have posted photos of it here to inspire and make you hungry! Hey, don't hate the cook, hate the desire ;) It's a simple recipe that can be adapted to suit anyones tastes or even if you have people who have allergies, this recipe works very well for them too. Although it is made with wheat flour so isn't applicable for coeliac suffers.
Here's the recipe for the pizza :
For the Base:
500g (and a little more) strong bread flour
25g fresh yeast
260ml water
15g salt

40ml olive oil
Mixed dry Italian herbs
Garlic powder
For the topping:
Tomato puree (use as much as you need to cover your pizza, or to taste)
Fresh garlic
Fresh onion
olive oil
Peeled plum tomatoes
Salt
Black Pepper
Mixed herbs
Method : 
1. In a bowl mix together 200g of the flour with the yeast, then add 160ml of the water and mix. Cover and set aside for 2 hours to rise.

2. Now mix in the remaining flour and water,adding the salt and olive oil. I sometimes find, depending on the brand of flour I'm using (or the country in which you live in), the dough mix remains a little too sticky at this point. If you find this too, just add some more flour before adding the herbs and knead in.
3. Now, take your garlic powder and mixed Italian herbs and sprinkle them around the edge (so in between the dough and the bowl) of your mix, and knead them in. This creates a lovely, fragrant and tasty base once cooked).

4. Set the dough aside in its mixing bowl to double in size.

4. Preheat the oven to 220ºC

5. Roll out the dough into a large circle and place on a lightly oiled baking sheet. Note : This also works in a square shape and I regularly bake my pizza on my oven tray (you know, the ones you get with your oven).

6. Bake the dough base for 5 minutes, then remove from the oven.
7. Meanwhile, chop the fresh garlic and onion finely (leaving some nice onion rings for topping) and add it to the oil, puree, tomatoes, herbs, salt and pepper in a saucepan and gently warm through on the hob.
8. Spread over your pizza, making sure to leave enough room on the edge so you can retrieve it from the oven without dirtying your oven mitts :)
9. Bake for a further 10-15 minutes, pull out just before the tomato mix starts changing colour.
10. Add your choice of toppings - cheese, onion, ham, pineapple, etc etc and return to the oven for about another 5-10 minutes, just until your topping is warmer thoroughly and cheese has melted.
Note : If you are having meat on top of your pizza that needs to be cooked, such as beef mince, chicken strips, pork cuts (yes, I have seen that) then please cook this prior to the oven stage. I probably don't need to specify this but just in case you're having 'one of those days' :)

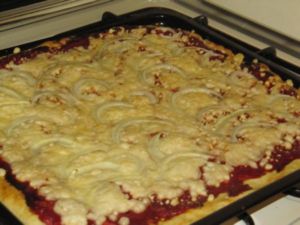
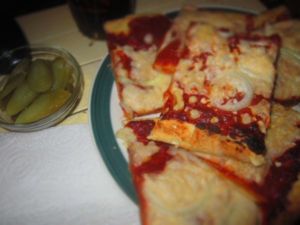
So here's a couple of photos of my creation, I did a nice simple one on Friday.
Image

The pizza in the tray, fresh from the oven 
Image
Ready to eat, with pickles at the ready (of course) and cold cola - yum!

Now, onto the pudding! Babka wouldn't be babka for me unless it was chocolate inside, and in a loaf tin. Maybe that's because I'm a purest and being part Lithuanian probably doesn't help decrease that. My nan would probably hate me if I did my babka any other way. 

My recipe for this is sort of a combination of my own creation and one I was given...it seems to work out ok and I've had no complaints  I have to say this was my first time cooking babka here in Israel so I was a little nervous about the change in flour, humidity and yeast.
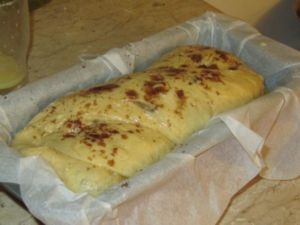
Here's a photo of the babka just before going into the oven -
Image

All risen and looking pretty :)

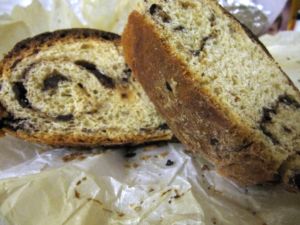
Now, I have to say I forgot to take another photo after it'd come out of the oven so I do apologise for this but to try and make up for it, here's a photo of a slice of it (before I devour it).
Image
Slices of chocolatey babka goodness

If you want a good babka recipe check out http://www.israelnationalnews.com/News/News.aspx/153119#.ULY-GeTFWSo It's a really nice recipe (from the looks of it, I haven't baked it myself) and it's well guided too so if it's your first time making babka, it's a good place to start without feeling overwhelmed!

I hope you enjoyed the photos and this marks my first savoury recipe I have posted! 
Make sure you share your babka and/or pizza stories, I always love hearing from you guys,
Happy Baking

Worth checking out:

This is Pizza

Slice

Foy Update

Pizza Blogger


Sunday, 29 July 2012

Peanut butter gluten free cookies - yum!

Posted by Unknown at 5:37 pm 0 comments
Man cannot live by bread alone; he must have peanut butter.

James A. Garfield


My lovely fiancé is seeming to get worse with his (what was a slight) gluten intolerance and of course this bothers me...who else do I subject to testing new inventions?!

Now I have to invent new gluten-free versions of recipes! Woohoo a genuine excuse to bake? I'm all over it.

So my first go at this is peanut butter cookies.

I hope you enjoy these as much as he seemed to!

Ingredients:

2 cups of peanut butter (smooth or crunchy - your choice)
1 cup of dark brown sugar
1 cup of caster sugar
1/2 chocolate chips

Method:

1. Preheat your oven to about 150c

2. Beat the peanut butter with a wooden spoon until it softens up some more and gets a bit creamier

3. Add the dark brown sugar and cream it with the peanut butter

4. Now add the caster sugar in bits, creaming as you go.

5. Finally, add your chocolate chips and you're done!

6. Bake on a grease proof paper lined baking tray for about 10 minutes or until golden brown

7. Let the cookies cool a bit on the grease proof paper and then transfer to a wire rack to cool completely

8. Store in an air tight container and (if they're not all eaten at once) they should last 5 days

Note: They will spread quite a bit during baking so give a lot of space around them!


Enjoy and let me see your versions of these.

Happy baking!

Friday, 27 July 2012

Hot cookies

Posted by Unknown at 4:18 pm 0 comments
The failure or incomplete success of a recipe often depends upon some little detail that has been misunderstood or overlooked in the preparation.

'A Book for a Cook' The Pillsbury Co. (1905)

Do you have problems with your dough spreading before going in the oven or your cookies/biscuits coming out thin, flat and too hard?

Don't worry, so did I when I first got back to baking them over here. Back in the U.K of course I didn't have to worry too often about humidity and although my kitchen did indeed get quite hot when the oven was on (it was a small kitchen), the rest of the house was cooler so it wouldn't ever run as hot as it does here.

Another HUGE  difference here is the oven I'm using. It's quite an old (and well used) one, with a door that doesn't shut totally, wonky shelving and not very specific temperature gauge. However, it was free so I'm not moaning - just stating a fact that it's another learning curve.

I've compiled a list of some tricks I've worked out, always done but had to adjust, or been told to try here for you all to give a go. I hope they help you and your baked goods as much as they've been helping me.

  • First of all, something I shouldn't need to say and you probably all do anyway - make sure you always measure your ingredients properly. If you don't add enough flour your little bakes will be flat and hard.

  • Chill your biscuit dough if it's a dough to roll out. The exception to this rule is oatmeal cookies - all types should be refrigerated for at least 2 hours before baking but preferably overnight.

  • After rolling out and cutting (or if not a rolled dough type of biscuit/cookies - after you've spooned out enough mix) your biscuits/cookies, put any unused mix into the refrigerator.

  • Try chilling your oven tray before you even put anything on it.

  • With biscuits/cookies like Sugar cookies you should also refrigerate the cut out cookies for about 10 minutes on the baking tray before putting them in your oven - this means they will keep their shape

  • Don't spoon out or add cut biscuits/cookies to a warm oven tray, this will make them spread

  • Make sure your butter/margarine isn't too soft before adding it to your sugar. If your recipe calls for blending/creaming the fat and sugar together, your fat should be soft enough to bend but not dripping or soggy.

  • DO NOT oil or grease in any way your baking sheets/grease proof paper - they're fine the way they are!

  • If you're not using baking sheets or grease proof paper, only use a tiny bit of oil/butter/margarine to grease your oven tray - too much fat will add to the mix and make your biscuits/cookies dense and flat.

  • Try transferring the cooked biscuits/cookies from the warm baking sheet/grease proof paper to a clean, fresh piece.

  • DO NOT mix your batter/dough too much. If you incorporate too much air into your mixture your biscuits/cookies will rise well in the oven and flatten dramatically once removed. Also this causes the butter/margarine to change consistency - making it melt which we don't want.

  • Make sure that if you're using baking powder or baking soda that it's not out of date.

  • Also, relating to the baking soda - using too much will cause flat, dark biscuits/cookies

  • If you're using a standing mixer or hand mixer and are adding such things like chocolate chips or nuts etc - always mix these in by hand.


I hope this helps any of you out there with the same problem :)

Happy baking!

Mamgu cookies

Posted by Unknown at 4:15 pm 0 comments
My grandmother was one of the greatest inspirations in my life. She taught me how to be a real woman, to have strength and self-respect, and to never give those things away.

Reese Witherspoon

I became inspired today to invent and bake some cookies that I think my mamgu (grandmother in Welsh) would have liked. She's been on my mind a lot recently and it's now reached a peak (she passed away a year ago today) so off to my kitchen I went.

Here's what I came up with -

20120720-232343.jpg


Ingredients:


300g Whole wheat flour
Chocolate chips (as many as you think is right)
2 eggs
1tsp Vanilla extract
50g cocoa powder
120g caster sugar
Canola Oil ( to add moisture)
100g margarine
Milk (enough to make a firm dough)
Ground ginger (just a dash)


Method:


1. Preheat your oven to 190c and line a baking tray with grease proof paper.


2. Cream the margarine and sugar together.


3. Add the eggs, one at a time and half the flour between each egg.


4. Add the remaining flour with the cocoa powder and some canola oil to bind it all together.


5. Add the chocolate chips and vanilla extract. Add some milk if it's not quite coming together.


6. Add the ground ginger, just about 1 teaspoon and knead in.


7. Form small balls and flatten them with the palm of your hand to make flat.


8. Bake in the centre of your oven for 10 minutes.


This has become a recipe I know will always have a sentimental value for me.

[caption id="attachment_322" align="aligncenter" width="210"] My lovely Nan[/caption]

Enjoy and as always let me know what you think of this recipe.

Happy baking!

Thursday, 26 July 2012

My new creation for today - Granola bars

Posted by Unknown at 3:02 pm 0 comments

20120726-121750.jpg


My granola bars before cutting


So I'm one of these people who absolutely loves oats in pretty much any form you can serve them to me - cookies, bread, porridge, savoury dishes and of course, breakfast bars.

I think this endless love comes from my Grandad, who used to, without fail, eat a bowl of porridge every morning. My favourite memories of him are mostly of me dutifully bringing up his bowl of porridge to him in bed and sitting there talking (more than likely complete rubbish) to him until he was finished.

It was thus inevitable that I'd create my own recipe for all the above (still a work in progress to do the whole list so stay tuned).

Here is my granola bar recipe :)

Ingredients:


160g butter, softened
160g packed brown sugar
2 tablespoons caster sugar dissolved in 1 tablespoon boiling water
About 400g rolled oats


(Optional but oh so good)
1 mashed banana
Bittersweet/dark chocolate chips
Any other fruit and/or nuts you wish


Method:


1. Preheat your oven to 180c.


2. Lightly grease a square tin (about 8x8 or 9x9,no bigger) as you can see in the photo, I had to use my loaf tin which made them too dense and a bit too soft so they were more like flapjacks.


3. Cream your butter and sugar together, mix in the sugar/water combination.


4. Add in your oats (and banana and chocolate if you want too, plus any other fruit or nuts you want). Mix well.


5. Bake for about 20 minutes.


6. Cut into pieces of desired size while still semi warm and leave in the tin to cool completely.


As always let me know what your experiments with this come out like.

Happy baking!

Wednesday, 25 July 2012

My favourite GLUTEN FREE brownie recipe

Posted by Unknown at 3:40 pm 2 comments
As I promised earlier this week, here is my favourite gluten free brownie recipe. It's also lovely and quick and tastes just as good as any other brownie recipe I think.

Ingredients:
100g Butter
150g Dark Chocolate
100g Gluten Free Plain Flour
200g Sugar
3 Eggs
1 tsp Baking Powder


Method:


1. Preheat your oven to 180c


2. Gently melt together the butter and chocolate


3. In a separate bowl mix together the flour, baking powder and sugar


4. Beat in the eggs followed by the melted butter and chocolate mixture
(if you want to add something like nuts or extra chocolate, nows the time people)


5. Pour into 150 x 200mm/6"x8" oiled and lined baking dish


6. Bake in a pre heated oven for 35/40 minutes.


Now enjoy and as always let me know how it turns out for you plus any wonderful substitutes you may have used.

Happy baking!

Monday, 23 July 2012

My favourite brownie recipe

Posted by Unknown at 2:40 pm 1 comments
Let's face it, a nice creamy chocolate cake does a lot for a lot of people; it does for me.

Audrey Hepburn

Who doesn't love a big, gooey (yep, I use this word a lot - I love it), chocolatey piece of brownie?
I'm certainly not one who can refuse it and one of my favourite things about brownies is if you cook it for slightly too long you still get a wonderful chocolate cake! Perfect.

I've written down here my favourite brownie recipe. Now this is sadly not one I created but unfortunately I don't remember where I found it so can't give credit. Also with this recipe it's easy to tinker with some of the ingredients, you can easily add more chocolate chips, add nuts or even fruit so you can really personalise it.

Ingredients:
185g butter/margarine
185g dark chocolate
85g plain flour
40g cocoa powder
50g white chocolate chips
50g milk chocolate chip
3 large eggs
275g caster sugar


Method:


1. Position your shelf to the middle of your oven. Preheat to 160c (fan assisted or 180c no fan).


2. Cut your butter/margarine into smallish cubes and put into a medium microwave safe bowl. Break your dark chocolate into small pieces and drop into the bowl with the butter.


3. Cover loosely with cling film and put in the microwave for 2 minutes on full power.


4. Leave mix to cool to room temperature.


5. Prepare your brownie tin with lining it with grease proof paper.


6. Break eggs into a large bowl and add the sugar. Whisk (on high-speed if using an electric whisk) until its thick and creamy. It should double in size.


7. Gently fold in the cooled chocolate butter mixture but go slow.


8. Now add the cocoa powder and flour (at the same time) by sieving and folding in.


9. Stir gently in the white and milk chocolate chips.


10. Pour into your prepared tin and cook for approx. 25 minutes or until the top has a shiny crust and the sides are pulling away.


Let me know how this turns out for you and what new yummy additions you make!

I'll be posting a gluten-free version in the next few days so stay tuned.

Happy baking!

Sunday, 22 July 2012

My well loved oatmeal chocolate chip cookies recipe

Posted by Unknown at 1:26 pm 2 comments
;
Number one, I absolutely love making chocolate chip cookies. I mean, it's fun. It's exciting. Beyond the fact that I love making them, I love eating them.

Debbi Fields

These gorgeous little chewy cookies melt in your mouth and are so fun to make too (hence that particular quote) so I thought I wouldn't be greedy and share the recipe with you all.

Note: I strongly advise you NOT to double this recipe, even if you could get a bowl big enough you wouldn't be able to mix it and it doesn't fit in any standing mixers bowl - believe me.

Ingredients:


225g butter or margarine
200g granulated sugar (important not to use caster sugar)
220g brown sugar (preferably light brown packed)
250g plain flour
245g oats
1 tsp vanilla extract
1 tsp baking soda (baking powder works just fine)
1 tsp salt


Method:


1. Preheat your oven to 190c


2. In a medium bowl, cream together the granulated and brown sugar with the butter/margarine.


3. Best in your eggs, one at a time and stir in the vanilla extract.


4. Combine the flour, baking soda and salt then sift into the creamed mixture. Stir to combine with a wooden spoon.


5. Mix in the oats (yep this'll give your forearm muscles a workout! Now you understand my note right?)


6. Cover and chill the dough for at least an hour.


7. Form walnut size balls on a baking tray, 2 inches or so apart and flatten with a fork lightly.


8. Bake for 8-10 minutes. Once cooked removed from tray immediately otherwise they'll stick. Cool on a wire rack.


Enjoy and Happy baking!
Showing posts with label Chocolate. Show all posts

Wednesday, 28 November 2012

Pizza and pudding update

As you (hopefully) read on Friday, I was in the throws of creating pizza and a pudding. The latter of which turned out to be babka. I adore baking babka - the steps you have to take, the patience involved, timing is crucial, and last but not least...the smell, that wonderful warm, childhood memories, sweet but delicate smell that emits from the oven after about 15-20 minutes of it going in.
As for the pizza - it came out, thankfully, just as expected and on time, I have posted photos of it here to inspire and make you hungry! Hey, don't hate the cook, hate the desire ;) It's a simple recipe that can be adapted to suit anyones tastes or even if you have people who have allergies, this recipe works very well for them too. Although it is made with wheat flour so isn't applicable for coeliac suffers.
Here's the recipe for the pizza :
For the Base:
500g (and a little more) strong bread flour
25g fresh yeast
260ml water
15g salt

40ml olive oil
Mixed dry Italian herbs
Garlic powder
For the topping:
Tomato puree (use as much as you need to cover your pizza, or to taste)
Fresh garlic
Fresh onion
olive oil
Peeled plum tomatoes
Salt
Black Pepper
Mixed herbs
Method : 
1. In a bowl mix together 200g of the flour with the yeast, then add 160ml of the water and mix. Cover and set aside for 2 hours to rise.

2. Now mix in the remaining flour and water,adding the salt and olive oil. I sometimes find, depending on the brand of flour I'm using (or the country in which you live in), the dough mix remains a little too sticky at this point. If you find this too, just add some more flour before adding the herbs and knead in.
3. Now, take your garlic powder and mixed Italian herbs and sprinkle them around the edge (so in between the dough and the bowl) of your mix, and knead them in. This creates a lovely, fragrant and tasty base once cooked).

4. Set the dough aside in its mixing bowl to double in size.

4. Preheat the oven to 220ºC

5. Roll out the dough into a large circle and place on a lightly oiled baking sheet. Note : This also works in a square shape and I regularly bake my pizza on my oven tray (you know, the ones you get with your oven).

6. Bake the dough base for 5 minutes, then remove from the oven.
7. Meanwhile, chop the fresh garlic and onion finely (leaving some nice onion rings for topping) and add it to the oil, puree, tomatoes, herbs, salt and pepper in a saucepan and gently warm through on the hob.
8. Spread over your pizza, making sure to leave enough room on the edge so you can retrieve it from the oven without dirtying your oven mitts :)
9. Bake for a further 10-15 minutes, pull out just before the tomato mix starts changing colour.
10. Add your choice of toppings - cheese, onion, ham, pineapple, etc etc and return to the oven for about another 5-10 minutes, just until your topping is warmer thoroughly and cheese has melted.
Note : If you are having meat on top of your pizza that needs to be cooked, such as beef mince, chicken strips, pork cuts (yes, I have seen that) then please cook this prior to the oven stage. I probably don't need to specify this but just in case you're having 'one of those days' :)

So here's a couple of photos of my creation, I did a nice simple one on Friday.
Image

The pizza in the tray, fresh from the oven 

Image
Ready to eat, with pickles at the ready (of course) and cold cola - yum!

Now, onto the pudding! Babka wouldn't be babka for me unless it was chocolate inside, and in a loaf tin. Maybe that's because I'm a purest and being part Lithuanian probably doesn't help decrease that. My nan would probably hate me if I did my babka any other way. 

My recipe for this is sort of a combination of my own creation and one I was given...it seems to work out ok and I've had no complaints  I have to say this was my first time cooking babka here in Israel so I was a little nervous about the change in flour, humidity and yeast.
Here's a photo of the babka just before going into the oven -
Image

All risen and looking pretty :)

Now, I have to say I forgot to take another photo after it'd come out of the oven so I do apologise for this but to try and make up for it, here's a photo of a slice of it (before I devour it).
Image
Slices of chocolatey babka goodness

If you want a good babka recipe check out http://www.israelnationalnews.com/News/News.aspx/153119#.ULY-GeTFWSo It's a really nice recipe (from the looks of it, I haven't baked it myself) and it's well guided too so if it's your first time making babka, it's a good place to start without feeling overwhelmed!

I hope you enjoyed the photos and this marks my first savoury recipe I have posted! 
Make sure you share your babka and/or pizza stories, I always love hearing from you guys,
Happy Baking

Worth checking out:

This is Pizza

Slice

Foy Update

Pizza Blogger


Sunday, 29 July 2012

Peanut butter gluten free cookies - yum!

Man cannot live by bread alone; he must have peanut butter.

James A. Garfield


My lovely fiancé is seeming to get worse with his (what was a slight) gluten intolerance and of course this bothers me...who else do I subject to testing new inventions?!

Now I have to invent new gluten-free versions of recipes! Woohoo a genuine excuse to bake? I'm all over it.

So my first go at this is peanut butter cookies.

I hope you enjoy these as much as he seemed to!

Ingredients:

2 cups of peanut butter (smooth or crunchy - your choice)
1 cup of dark brown sugar
1 cup of caster sugar
1/2 chocolate chips

Method:

1. Preheat your oven to about 150c

2. Beat the peanut butter with a wooden spoon until it softens up some more and gets a bit creamier

3. Add the dark brown sugar and cream it with the peanut butter

4. Now add the caster sugar in bits, creaming as you go.

5. Finally, add your chocolate chips and you're done!

6. Bake on a grease proof paper lined baking tray for about 10 minutes or until golden brown

7. Let the cookies cool a bit on the grease proof paper and then transfer to a wire rack to cool completely

8. Store in an air tight container and (if they're not all eaten at once) they should last 5 days

Note: They will spread quite a bit during baking so give a lot of space around them!


Enjoy and let me see your versions of these.

Happy baking!

Friday, 27 July 2012

Hot cookies

The failure or incomplete success of a recipe often depends upon some little detail that has been misunderstood or overlooked in the preparation.

'A Book for a Cook' The Pillsbury Co. (1905)

Do you have problems with your dough spreading before going in the oven or your cookies/biscuits coming out thin, flat and too hard?

Don't worry, so did I when I first got back to baking them over here. Back in the U.K of course I didn't have to worry too often about humidity and although my kitchen did indeed get quite hot when the oven was on (it was a small kitchen), the rest of the house was cooler so it wouldn't ever run as hot as it does here.

Another HUGE  difference here is the oven I'm using. It's quite an old (and well used) one, with a door that doesn't shut totally, wonky shelving and not very specific temperature gauge. However, it was free so I'm not moaning - just stating a fact that it's another learning curve.

I've compiled a list of some tricks I've worked out, always done but had to adjust, or been told to try here for you all to give a go. I hope they help you and your baked goods as much as they've been helping me.

  • First of all, something I shouldn't need to say and you probably all do anyway - make sure you always measure your ingredients properly. If you don't add enough flour your little bakes will be flat and hard.

  • Chill your biscuit dough if it's a dough to roll out. The exception to this rule is oatmeal cookies - all types should be refrigerated for at least 2 hours before baking but preferably overnight.

  • After rolling out and cutting (or if not a rolled dough type of biscuit/cookies - after you've spooned out enough mix) your biscuits/cookies, put any unused mix into the refrigerator.

  • Try chilling your oven tray before you even put anything on it.

  • With biscuits/cookies like Sugar cookies you should also refrigerate the cut out cookies for about 10 minutes on the baking tray before putting them in your oven - this means they will keep their shape

  • Don't spoon out or add cut biscuits/cookies to a warm oven tray, this will make them spread

  • Make sure your butter/margarine isn't too soft before adding it to your sugar. If your recipe calls for blending/creaming the fat and sugar together, your fat should be soft enough to bend but not dripping or soggy.

  • DO NOT oil or grease in any way your baking sheets/grease proof paper - they're fine the way they are!

  • If you're not using baking sheets or grease proof paper, only use a tiny bit of oil/butter/margarine to grease your oven tray - too much fat will add to the mix and make your biscuits/cookies dense and flat.

  • Try transferring the cooked biscuits/cookies from the warm baking sheet/grease proof paper to a clean, fresh piece.

  • DO NOT mix your batter/dough too much. If you incorporate too much air into your mixture your biscuits/cookies will rise well in the oven and flatten dramatically once removed. Also this causes the butter/margarine to change consistency - making it melt which we don't want.

  • Make sure that if you're using baking powder or baking soda that it's not out of date.

  • Also, relating to the baking soda - using too much will cause flat, dark biscuits/cookies

  • If you're using a standing mixer or hand mixer and are adding such things like chocolate chips or nuts etc - always mix these in by hand.


I hope this helps any of you out there with the same problem :)

Happy baking!

Mamgu cookies

My grandmother was one of the greatest inspirations in my life. She taught me how to be a real woman, to have strength and self-respect, and to never give those things away.

Reese Witherspoon

I became inspired today to invent and bake some cookies that I think my mamgu (grandmother in Welsh) would have liked. She's been on my mind a lot recently and it's now reached a peak (she passed away a year ago today) so off to my kitchen I went.

Here's what I came up with -

20120720-232343.jpg


Ingredients:


300g Whole wheat flour
Chocolate chips (as many as you think is right)
2 eggs
1tsp Vanilla extract
50g cocoa powder
120g caster sugar
Canola Oil ( to add moisture)
100g margarine
Milk (enough to make a firm dough)
Ground ginger (just a dash)


Method:


1. Preheat your oven to 190c and line a baking tray with grease proof paper.


2. Cream the margarine and sugar together.


3. Add the eggs, one at a time and half the flour between each egg.


4. Add the remaining flour with the cocoa powder and some canola oil to bind it all together.


5. Add the chocolate chips and vanilla extract. Add some milk if it's not quite coming together.


6. Add the ground ginger, just about 1 teaspoon and knead in.


7. Form small balls and flatten them with the palm of your hand to make flat.


8. Bake in the centre of your oven for 10 minutes.


This has become a recipe I know will always have a sentimental value for me.

[caption id="attachment_322" align="aligncenter" width="210"] My lovely Nan[/caption]

Enjoy and as always let me know what you think of this recipe.

Happy baking!

Thursday, 26 July 2012

My new creation for today - Granola bars

20120726-121750.jpg


My granola bars before cutting


So I'm one of these people who absolutely loves oats in pretty much any form you can serve them to me - cookies, bread, porridge, savoury dishes and of course, breakfast bars.

I think this endless love comes from my Grandad, who used to, without fail, eat a bowl of porridge every morning. My favourite memories of him are mostly of me dutifully bringing up his bowl of porridge to him in bed and sitting there talking (more than likely complete rubbish) to him until he was finished.

It was thus inevitable that I'd create my own recipe for all the above (still a work in progress to do the whole list so stay tuned).

Here is my granola bar recipe :)

Ingredients:


160g butter, softened
160g packed brown sugar
2 tablespoons caster sugar dissolved in 1 tablespoon boiling water
About 400g rolled oats


(Optional but oh so good)
1 mashed banana
Bittersweet/dark chocolate chips
Any other fruit and/or nuts you wish


Method:


1. Preheat your oven to 180c.


2. Lightly grease a square tin (about 8x8 or 9x9,no bigger) as you can see in the photo, I had to use my loaf tin which made them too dense and a bit too soft so they were more like flapjacks.


3. Cream your butter and sugar together, mix in the sugar/water combination.


4. Add in your oats (and banana and chocolate if you want too, plus any other fruit or nuts you want). Mix well.


5. Bake for about 20 minutes.


6. Cut into pieces of desired size while still semi warm and leave in the tin to cool completely.


As always let me know what your experiments with this come out like.

Happy baking!

Wednesday, 25 July 2012

My favourite GLUTEN FREE brownie recipe

As I promised earlier this week, here is my favourite gluten free brownie recipe. It's also lovely and quick and tastes just as good as any other brownie recipe I think.

Ingredients:
100g Butter
150g Dark Chocolate
100g Gluten Free Plain Flour
200g Sugar
3 Eggs
1 tsp Baking Powder


Method:


1. Preheat your oven to 180c


2. Gently melt together the butter and chocolate


3. In a separate bowl mix together the flour, baking powder and sugar


4. Beat in the eggs followed by the melted butter and chocolate mixture
(if you want to add something like nuts or extra chocolate, nows the time people)


5. Pour into 150 x 200mm/6"x8" oiled and lined baking dish


6. Bake in a pre heated oven for 35/40 minutes.


Now enjoy and as always let me know how it turns out for you plus any wonderful substitutes you may have used.

Happy baking!

Monday, 23 July 2012

My favourite brownie recipe

Let's face it, a nice creamy chocolate cake does a lot for a lot of people; it does for me.

Audrey Hepburn

Who doesn't love a big, gooey (yep, I use this word a lot - I love it), chocolatey piece of brownie?
I'm certainly not one who can refuse it and one of my favourite things about brownies is if you cook it for slightly too long you still get a wonderful chocolate cake! Perfect.

I've written down here my favourite brownie recipe. Now this is sadly not one I created but unfortunately I don't remember where I found it so can't give credit. Also with this recipe it's easy to tinker with some of the ingredients, you can easily add more chocolate chips, add nuts or even fruit so you can really personalise it.

Ingredients:
185g butter/margarine
185g dark chocolate
85g plain flour
40g cocoa powder
50g white chocolate chips
50g milk chocolate chip
3 large eggs
275g caster sugar


Method:


1. Position your shelf to the middle of your oven. Preheat to 160c (fan assisted or 180c no fan).


2. Cut your butter/margarine into smallish cubes and put into a medium microwave safe bowl. Break your dark chocolate into small pieces and drop into the bowl with the butter.


3. Cover loosely with cling film and put in the microwave for 2 minutes on full power.


4. Leave mix to cool to room temperature.


5. Prepare your brownie tin with lining it with grease proof paper.


6. Break eggs into a large bowl and add the sugar. Whisk (on high-speed if using an electric whisk) until its thick and creamy. It should double in size.


7. Gently fold in the cooled chocolate butter mixture but go slow.


8. Now add the cocoa powder and flour (at the same time) by sieving and folding in.


9. Stir gently in the white and milk chocolate chips.


10. Pour into your prepared tin and cook for approx. 25 minutes or until the top has a shiny crust and the sides are pulling away.


Let me know how this turns out for you and what new yummy additions you make!

I'll be posting a gluten-free version in the next few days so stay tuned.

Happy baking!

Sunday, 22 July 2012

My well loved oatmeal chocolate chip cookies recipe

;
Number one, I absolutely love making chocolate chip cookies. I mean, it's fun. It's exciting. Beyond the fact that I love making them, I love eating them.

Debbi Fields

These gorgeous little chewy cookies melt in your mouth and are so fun to make too (hence that particular quote) so I thought I wouldn't be greedy and share the recipe with you all.

Note: I strongly advise you NOT to double this recipe, even if you could get a bowl big enough you wouldn't be able to mix it and it doesn't fit in any standing mixers bowl - believe me.

Ingredients:


225g butter or margarine
200g granulated sugar (important not to use caster sugar)
220g brown sugar (preferably light brown packed)
250g plain flour
245g oats
1 tsp vanilla extract
1 tsp baking soda (baking powder works just fine)
1 tsp salt


Method:


1. Preheat your oven to 190c


2. In a medium bowl, cream together the granulated and brown sugar with the butter/margarine.


3. Best in your eggs, one at a time and stir in the vanilla extract.


4. Combine the flour, baking soda and salt then sift into the creamed mixture. Stir to combine with a wooden spoon.


5. Mix in the oats (yep this'll give your forearm muscles a workout! Now you understand my note right?)


6. Cover and chill the dough for at least an hour.


7. Form walnut size balls on a baking tray, 2 inches or so apart and flatten with a fork lightly.


8. Bake for 8-10 minutes. Once cooked removed from tray immediately otherwise they'll stick. Cool on a wire rack.


Enjoy and Happy baking!
 

Caru Cakes Copyright 2009 Sweet Cupcake Designed by Ipiet Templates Image by Tadpole's Notez